How to Customise your Jeans with a Vintage-Patch Iron on Patching Decor Kit
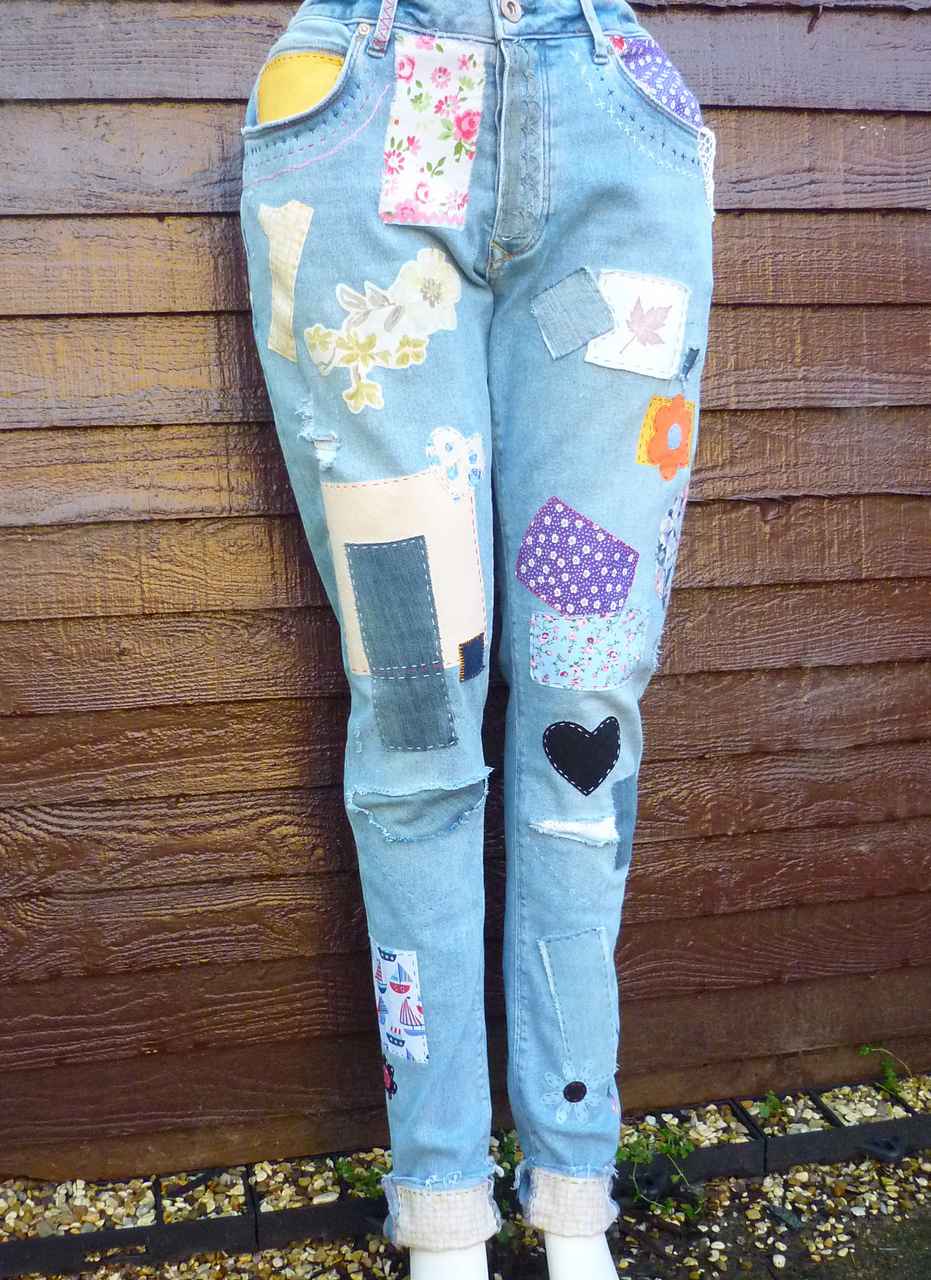
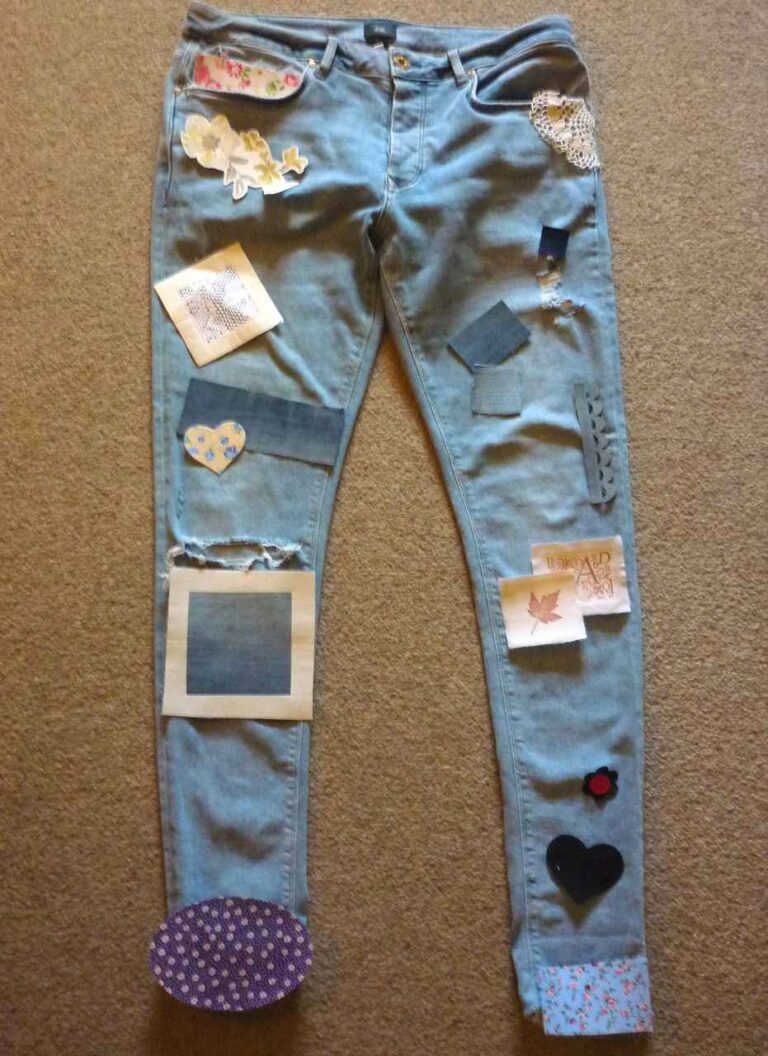
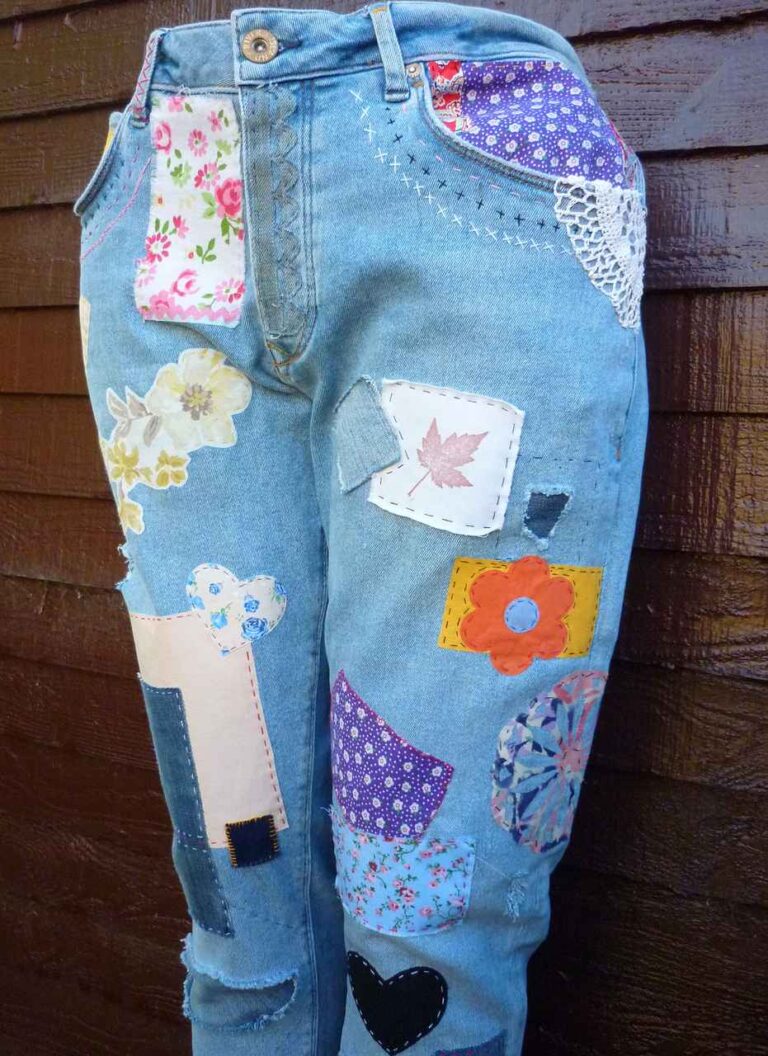
If you’ve ever admired those heavily patched and decorated designer jeans retailing for £100s, here’s a DIY solution for a unique and eclectic way to express your creativity and create your own for a fraction of the price.
Better still, it’s not only jeans you can customise using these packs. You can upcycle jackets, jumpers and more with the Vintage-Patch iron-on range which is created from vintage, reclaimed and contemporary fabrics.
With two pack sizes containing a variety of shapes, sizes and textures – you can choose to use a whole pack for one garment, or share the contents between a few projects.
As well as the instructions that follow, we highly recommend you study our detailed pictorial ‘how to’ guides for Iron on Cotton Patches, Reverse Repair Patches and Adhesive Sheets before beginning your project at www.vintage-patch.co.uk/patch-tutorials/
What's in the Kit?
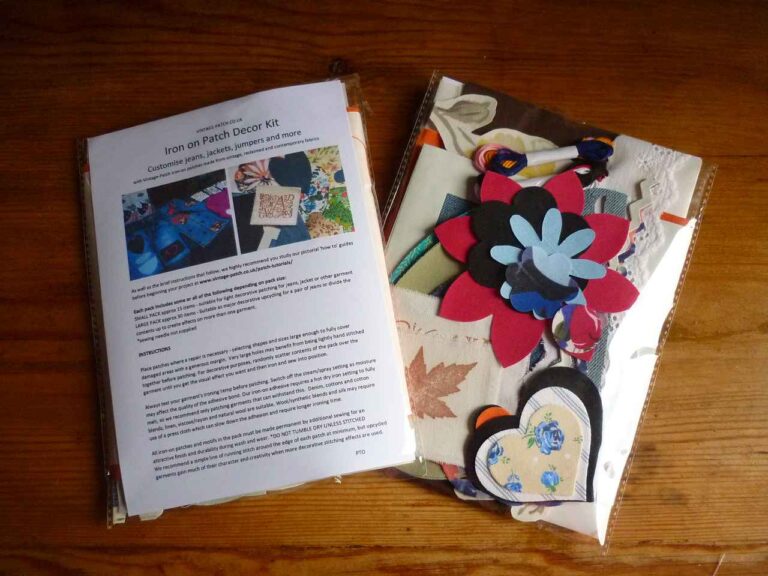
Pack Contents
Each Decor pack includes some or all of the following depending on pack size:
The lists and photo gallery in this section show typical contents but exact designs will depend on fabrics and trims in stock at time of purchase. Most items have an iron-on backing but must also be secured permanently with stitching. *sewing needle not supplied
SMALL PACK £15
Approx 15+ items – suitable for light decorative patching for a pair of jeans, jacket or other garment.
1 small Jeans Repair Undercover Patch 1 medium Jeans Repair Undercover Patch 1 set Iron on Cotton Elbow / Knee Patches (plain or print, usually oval but shapes may vary) 1 small lace trim or motif (not iron on) 1 Iron on Adhesive Sheet 1/4 a4 (for use with your own fabric) 1 small stamped / stenciled square 1 x 3m embroidery floss in random colours 1 print fabric small heart shape 1 denim die cut patch (shapes vary) 1 doiley die cut shape Small piece braid, fringe or tassel 1 large plain cotton random shape 1 medium plain cotton random shape 1 large print cotton random shape 1 medium print cotton random shape Pinch of small die or fussy cut shapes or motifs
LARGE PACK £28
Approx 30+ items – Suitable as major decorative upcycling for a pair of jeans or divide the contents up to create effects on more than one garment.
1 small Jeans repair Undercover Patch 1 medium Lace Jeans Repair Undercover Patch 1 large Jeans Repair Undercover Patch 1 set plain cotton Iron-on Elbow / Knee Patches 1 set print cotton Iron-on Elbow Knee Patches 1 medium Lace trim/motif or 2 small 1 Iron On Adhesive Sheet A5 size 1 non adhesive fabric A5 size 1 stamped / stenciled square small 1 stamped / stenciled square med 2 x 3m embroidery floss in random colours 1 print cotton small heart 1 plain cotton small heart 1 denim die cut patch (shapes may vary) 1 doiley shape die cut 1 x 10 cm approx iron on ricrac trim 1 x 10 cm approx iron on decorative border trim Small piece braid, fringe or tassel 1 small flower die cut 1 med flower die cut 1 large flower die cut 1 fussy cut flower from fabric 2 large plain cotton random shape 2 med plain cotton random shape 2 large print cotton random shape 2 med print cotton random shape Pinch of random fray edge denim shapes Pinch of small die cut or fussy cut shapes or motifs
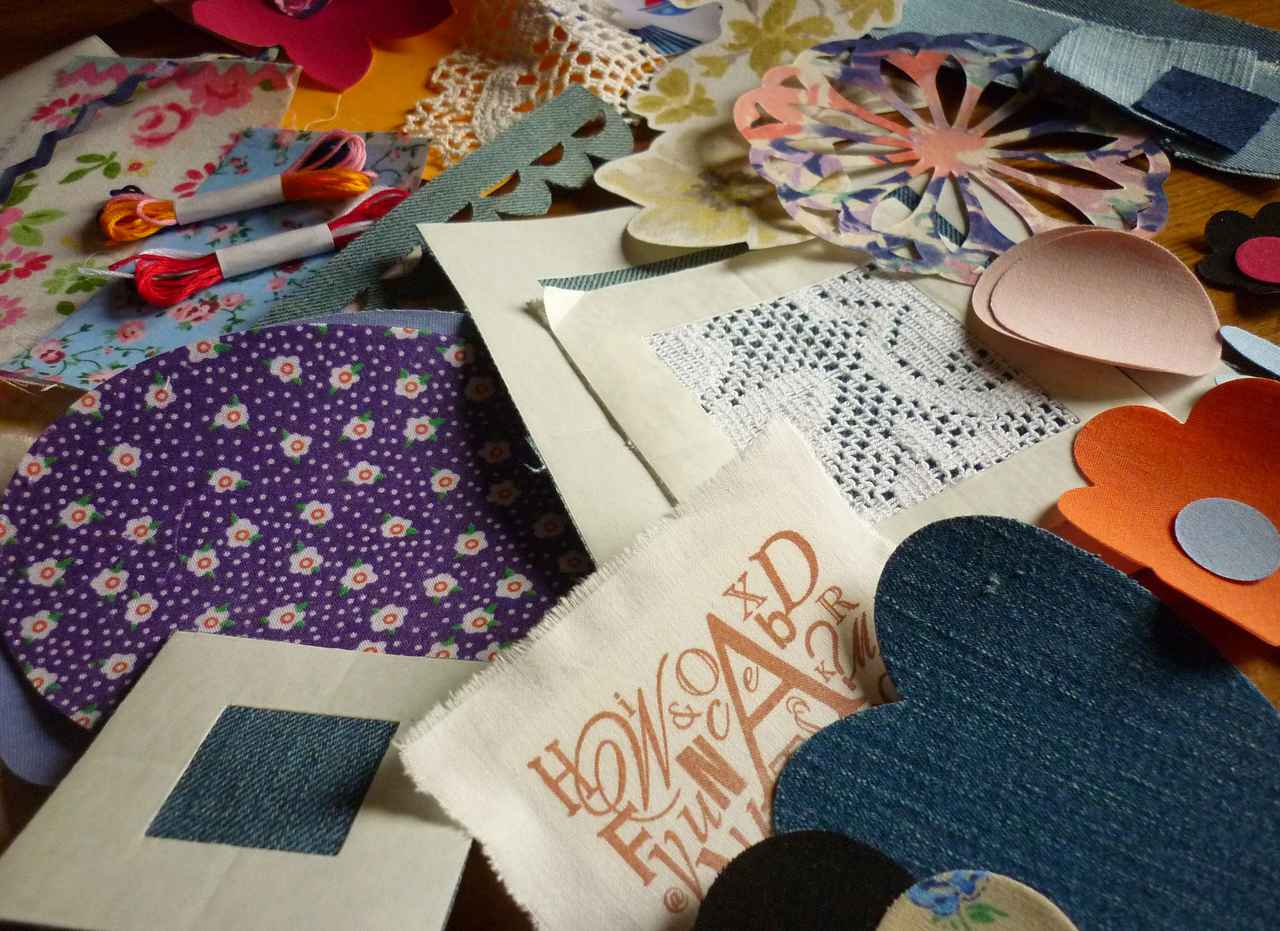
Pack Contents in pictures (*colours, shapes, sizes and designs may vary)
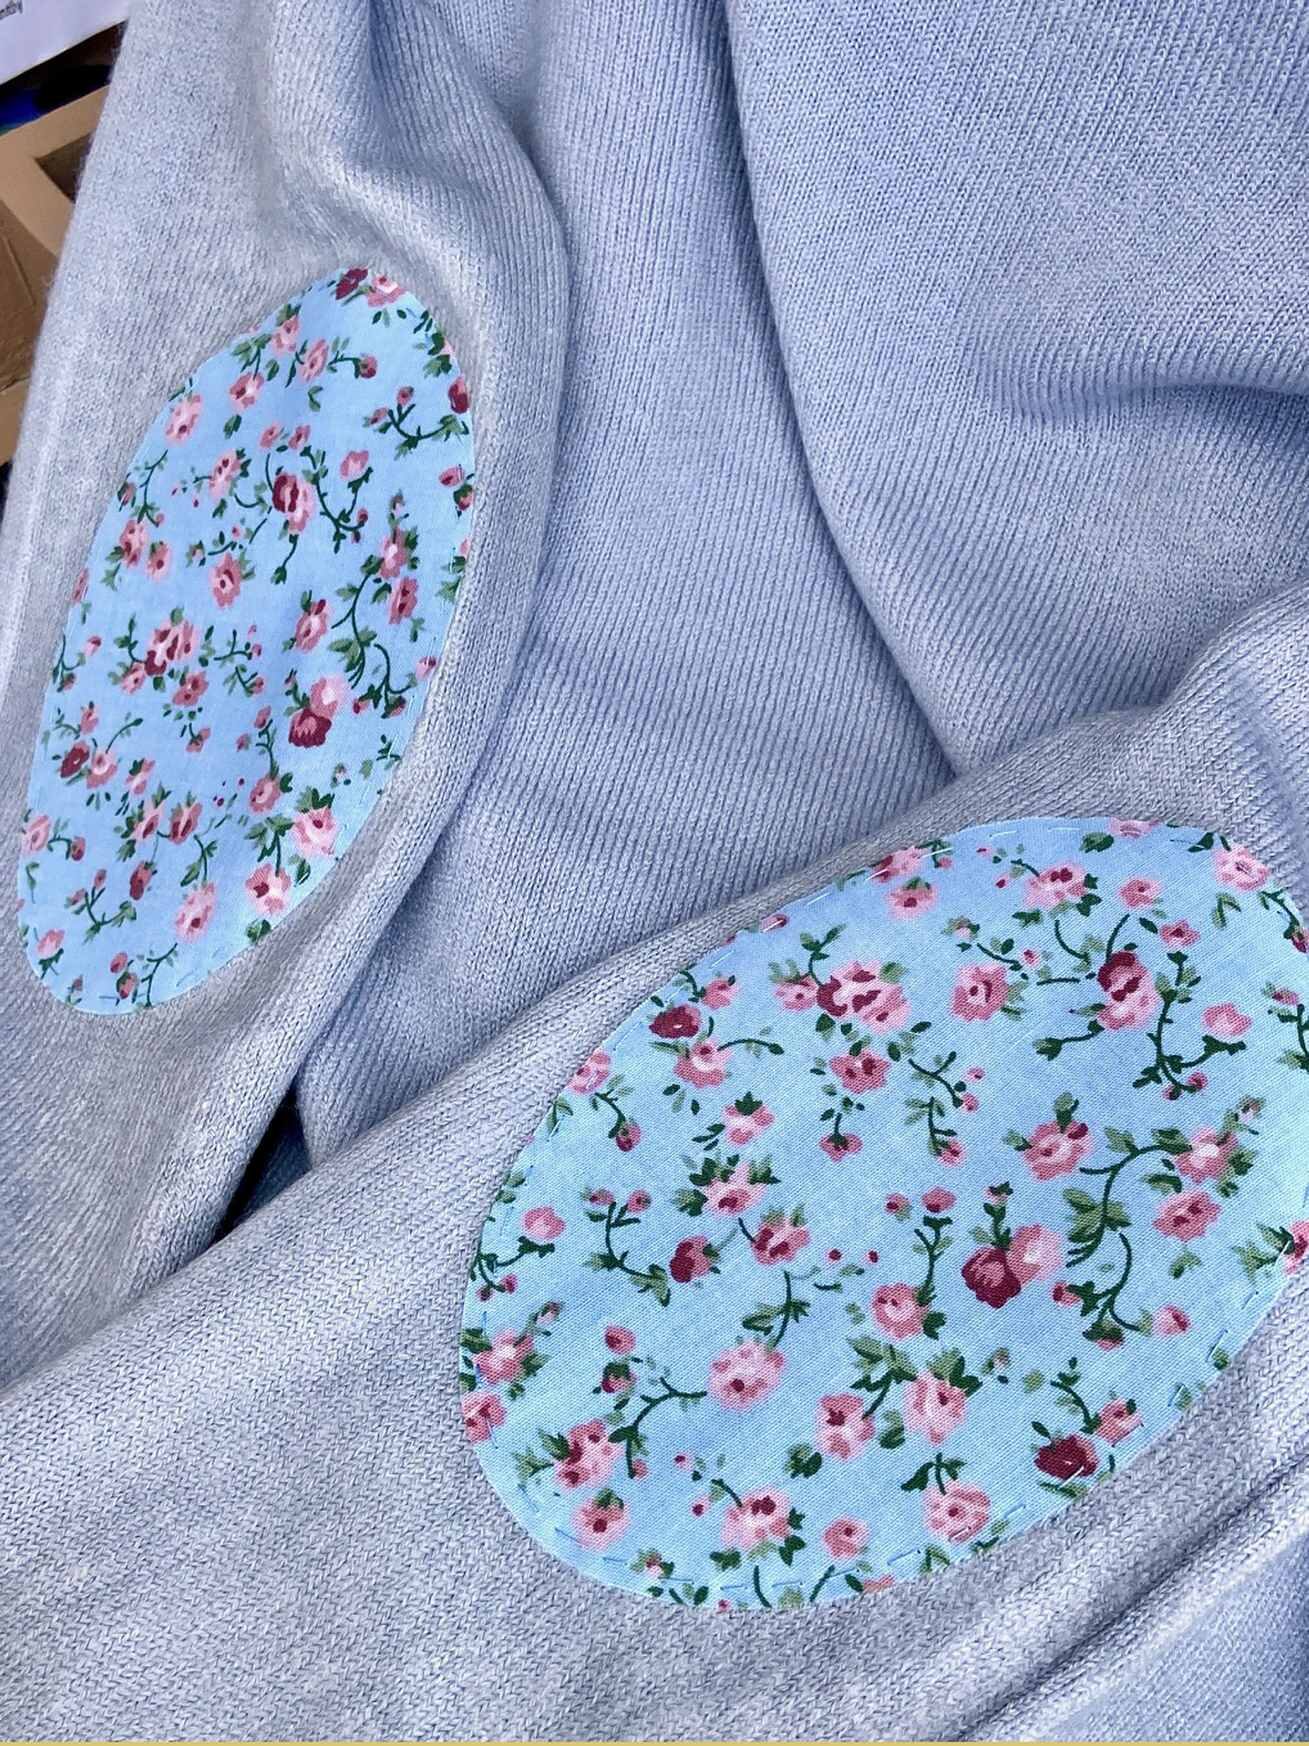
Vintage-Patch iron-on oval or rectangle knee / elbow patches in plain and print cotton
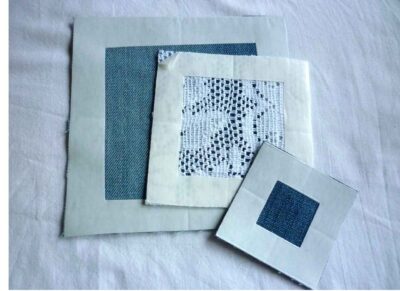
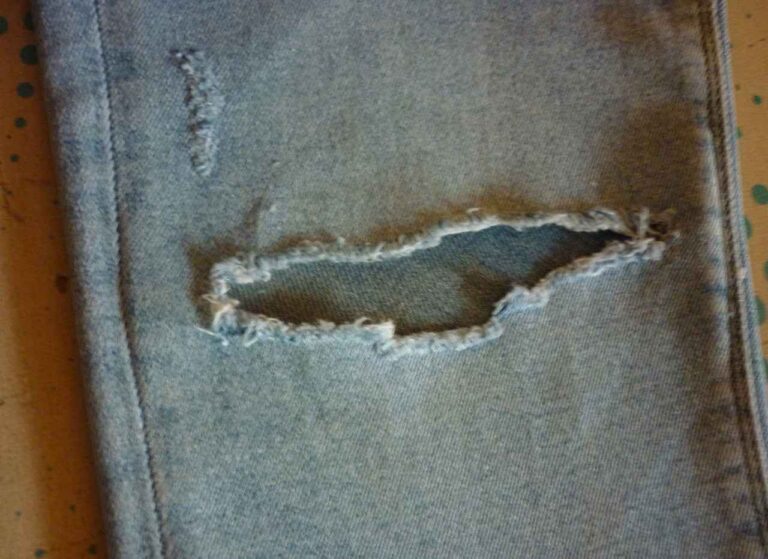
Vintage-Patch Jeans Reverse Repair Undercover Patches are perfect to create a peekaboo effect behind a tear
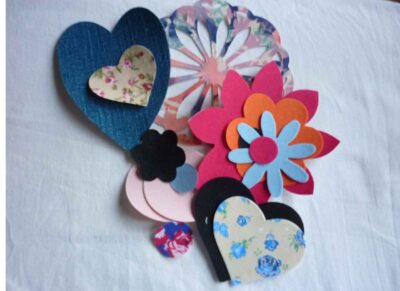
A selection of Vintage-Patch die cut iron on decorative shapes including flowers, hearts, doilies and more
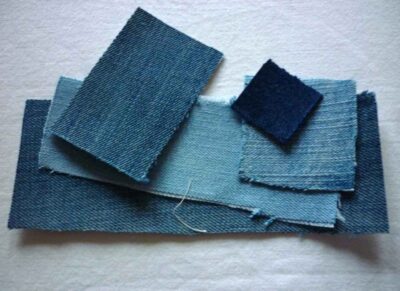
Iron-on random irregular denim shapes for a casual homespun effect. Cut to fray naturally at the edges during wash and wear.
Iron-on random irregular cotton shapes in plain or print.
Rubber stamped or fabric painted motifs with raw edges and iron on backing
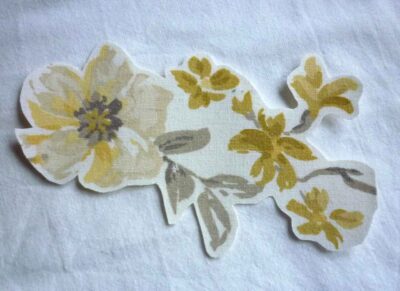
Fussy cut iron-on motifs and patterns
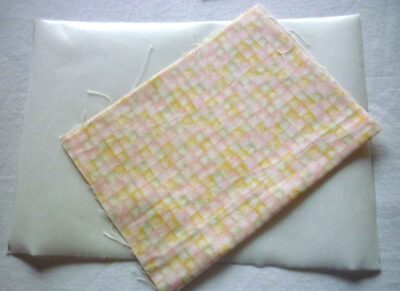
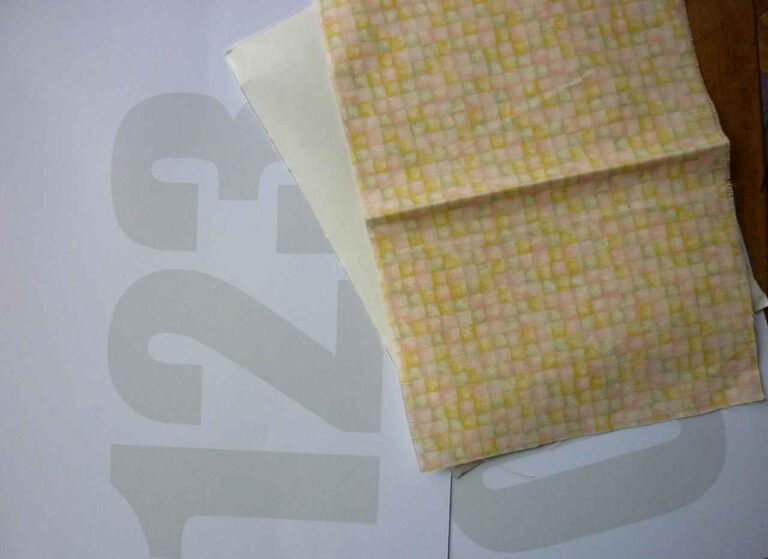
Vintage-Patch Iron-on Adhesive Sheet, ideal for cutting out personalised shapes, numbers and letters from your own fabric
Non backed fabrics and trims including lace scraps, ribbon or binding, crochet shapes and so on
Small iron on border accents and ricrac
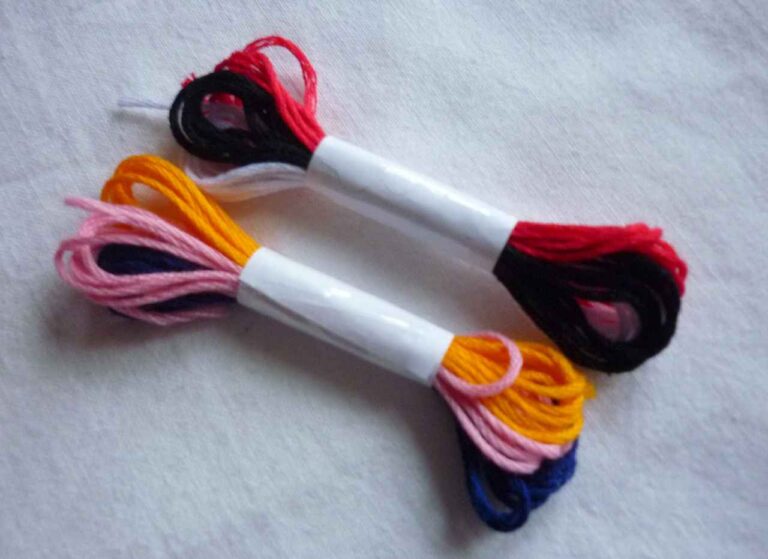
A small selection of embroidery floss in random colours sufficient to secure all the patches in your pack with running stitich
Read this before making a start!
ESSENTIAL INSTRUCTIONS FOR BEST RESULTS
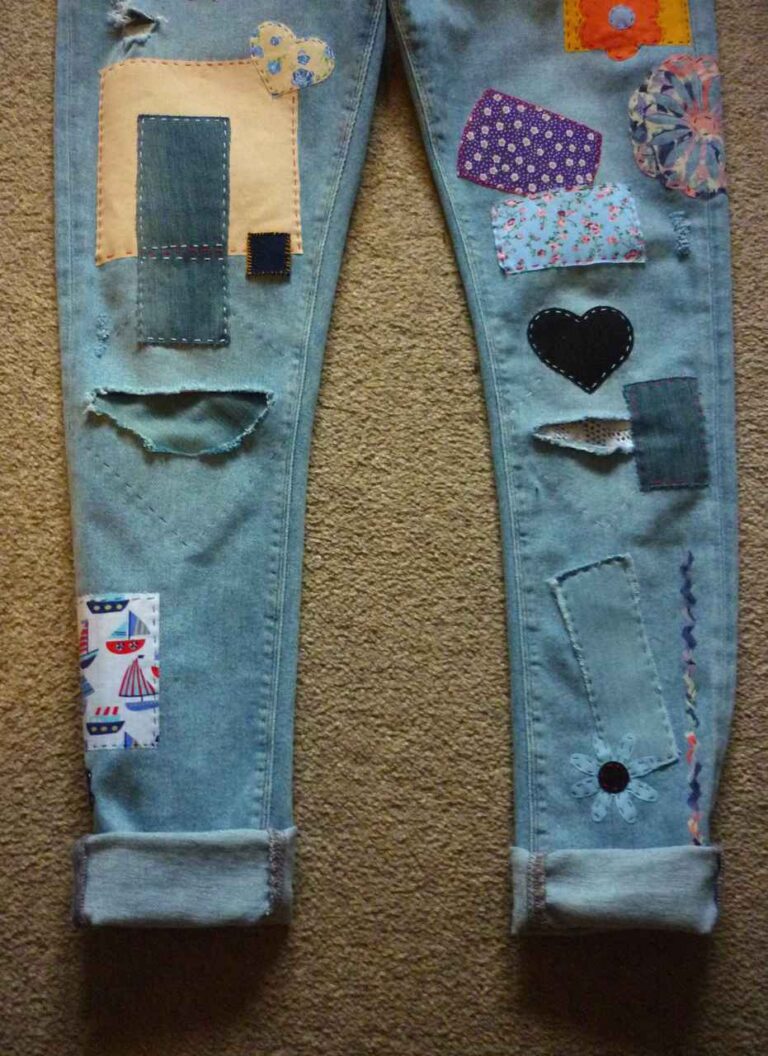
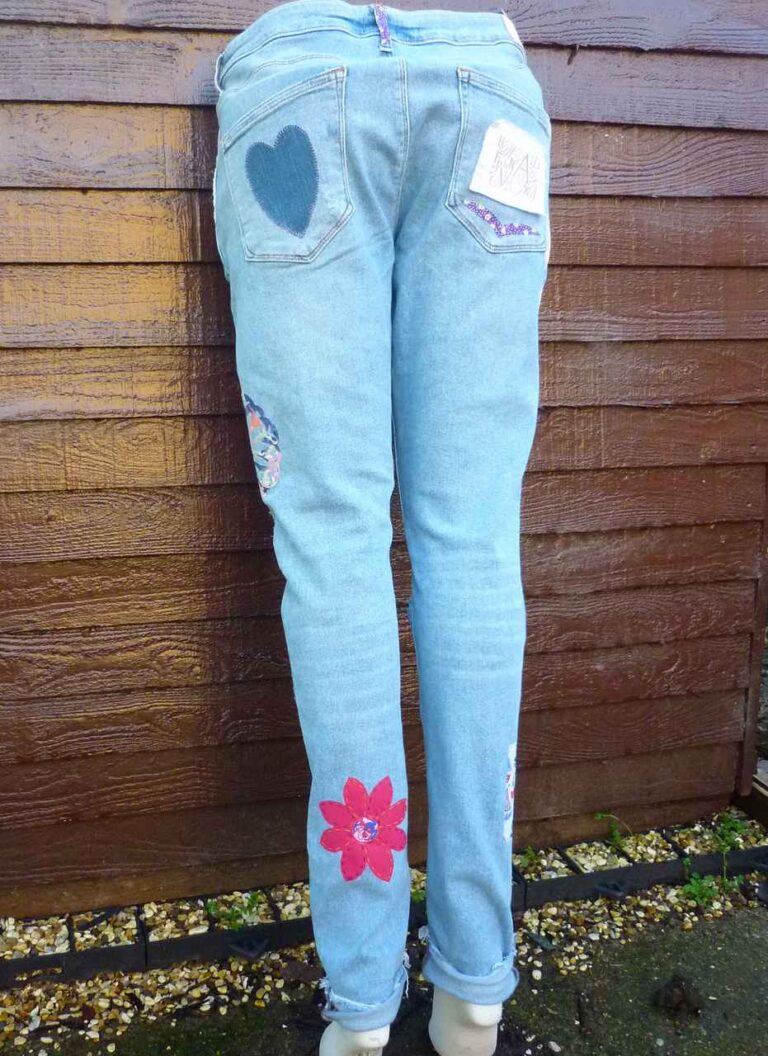
Place patches where a repair is necessary – selecting shapes and sizes large enough to fully cover damaged areas with a generous margin. Very large holes will benefit from being lightly hand stitched together before patching. For decorative purposes, randomly scatter the contents of the pack over the garment until you get the visual effect you want and then iron and sew into position. You may find you want to alter or swap positions somewhat during the application process.
Concise Instructions for the main types of patch in the pack follow but there are links to full pictorial ‘how to’ tutorials at the foot of the page also.
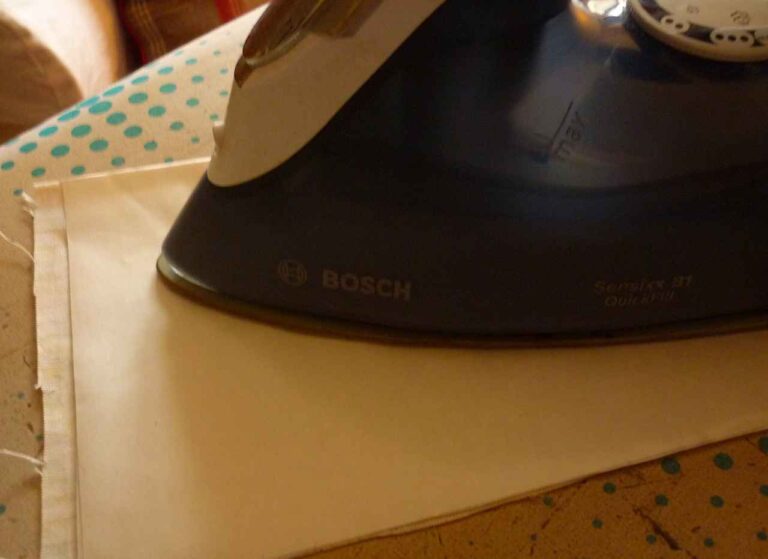
Always test your garment’s ironing temp before patching. Switch off the steam/spray setting as moisture may affect the quality of the adhesive bond. Our iron-on adhesive requires a Medium (2 dots, 130-150 degrees) to Hot (3 dots, 160+ degrees) dry iron setting to fully melt, so we recommend only patching garments that can withstand this. Denim, cottons and cotton blends, linen, viscose/rayon and natural wool are suitable. Wool/synthetic blends and silk may require use of a press cloth which can slow down the adhesion and require longer ironing time.
All iron-on patches and motifs in the pack must be made permanent by additional sewing for an attractive finish and durability during wash and wear. *DO NOT TUMBLE DRY UNLESS STITCHED We recommend a simple line of running stitch around the edge of each patch at minimum, but upcycled garments gain much of their character and creativity when more decorative stitching effects are used.
A rough layout is helpful, though you can swap things around before application if necessary
Patches can look really good overlapping each other and you will see we have used this technique in our finished pair of jeans at the top of the page, but please note that overlapping will create additional thickness to stitch through – and during wear so please bear this in mind when planning placement.
IRON-ON PATCHES GUIDE
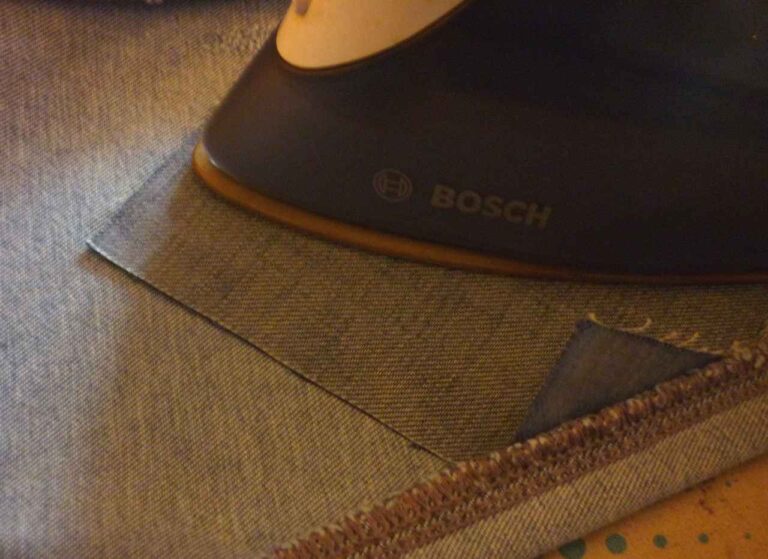
To use, remove the paper backing to expose the shiny glue layer, place into position and iron on using the hottest temp your garment can stand. Give thicker patches such as denim a longer ironing time to ensure the glue backing melts sufficiently.
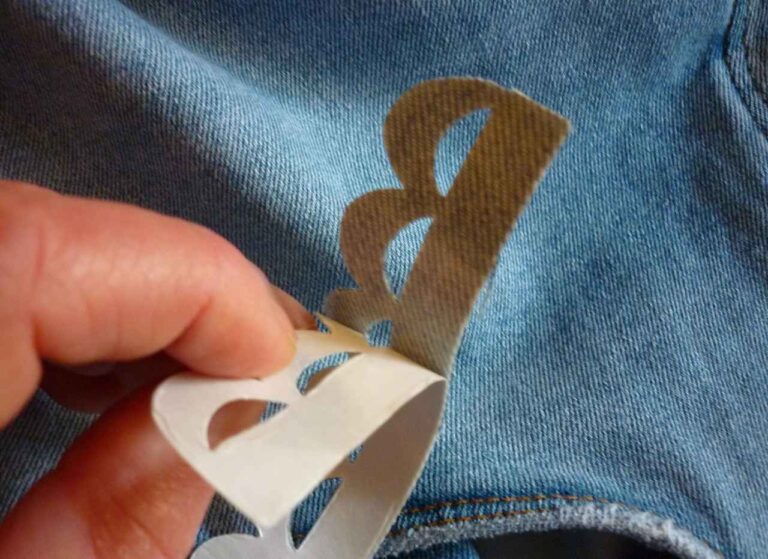
The following may be included in your pack a) Set of iron-on elbow or knee patches. Usually in oval, rectangle or heart, in plain or print designs. b) Iron-on random denim and cotton shapes – these are cut to irregular shapes for a casual homespun effect. Those with margin of fabric around the iron-on backing will fray naturally at the edges during wash and wear. You can aid the fraying by carefully pulling loose threads free, or cut the fabric flush with the glue backing edges if you prefer a cleaner edge. c) Decorative iron-on cotton shapes and motifs. These are die cut and can include flowers, leaves, letters, numbers and more. They and can be quite intricate in design so stitching around the edges will keep them in place and avoid edge details coming loose and curling.
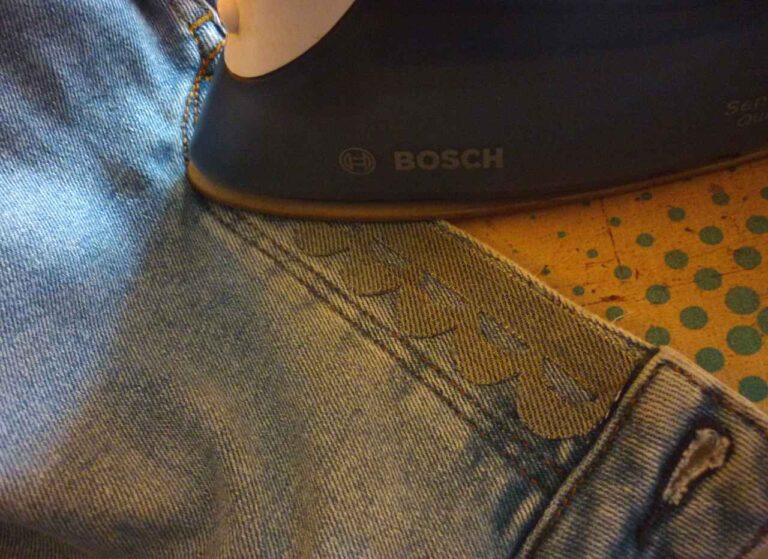
These are square shapes with an adhesive paper margin around the edge of the right side of the fabric. They are designed for when you want to repair jeans from underneath an existing hole or tear for a peekaboo effect. They are available in the decor packs in denim (as pictured here), cotton or lace depending on current stock.
Turn your jeans inside out. Remove paper from glued section and place patch over the tear right side down ensuring the shiny glued margin is not visible through the hole. Iron into position.
Turn jeans to right side, iron again from this side and stitch around the square edge of the patch to secure it permanently. You can tidy up the aperture if you wish by trimming away any loose threads. Tip: if your jeans don’t have a hole, you can carefully make your own tear to create this effect if desired.
In all cases, ensure the tear is no bigger than the unglued area of the reverse repair patch.
You may have a favourite fabric of your own that you wish to use, and this paper can be ironed on to the back of most cotton materials to create your own iron-on shapes.
It is especially good for large motifs such as flowers and personalised letters or numbers.
Place the shiny (glue) side of the sheet down on the back of your piece of fabric. Apply DRY iron heat to iron it into position, pressing from front and back of the fabric to get a smooth finish. TIP! Start with the LOW MEDIUM (1-2 dotS) temp setting and increase gradually to higher settings to avoid blistering the adhesive during initial application to fabric.
Use a template or draw a freehand shape onto the paper backing. For example, here we have printed and cut out some number templates. IMPORTANT! Ensure that you place mirror images of any text or numbers on to the paper before cutting out to ensure the fabric side result is the correct way round.
Finally, cut out the shape/s you have made, peel off the backing paper and iron on to the garment where desired.
These might be plain fabric, lace scraps, crochet shapes, fringes and trims (with no adhesive backing).
Simply cut to your desired size and shape, and sew securely into position.
DECORATIVE FLOSS FOR STITCHING
Each Vintage-Patch Jeans Decor pack includes a small selection of embroidery floss in random colours sufficient to secure all the patches in your pack with running stitich when instructions are followed. You may wish to obtain additional floss if you intend to create more complicated stitching effects such as Sashiko / Boro, or if you use more than one strand of thread at a time.
Separate out a strand of floss in your chosen colour to thread up a general purpose sewing needle (*not supplied)
Once your patches have been ironed into place, add some decorative embroidery to secure everything and make it look fantastic.
We recommend traditional stitching techniques such as running stitch, chain stitch, blanket stitch, and Japanese Sashiko. Details of all these stitching techniques can be found online or in a library, or see the link below the photo.
TROUBLESHOOTING If your patches are not sticking well, this could be due to a) too low an iron temperature, b) moisture from the steam/spray iron setting, c) removing the adhesive with the backing paper (always check you see a shiny film of adhesive on the patch or motif before applying). Take great care not to get glue from the patches onto your iron plate as it is difficult to remove. If it does happen, try ironing a wet cotton tea towel folded into a pad, with your iron on the max setting.
We always recommend starting with Low Medium iron temperature and raising it gradually towards max heat until a firm fix is achieved.
£6.99Select options
This product has multiple variants. The options may be chosen on the product page
20% OFF your next order and a free patching handbook!
Subscribe to emails from Vintage-Patch and download my new pictorial patching guide ‘Step by Step to Success with Iron on Patches’ completely FREE! What’s more, the ebook contains a 20% off voucher code for your next order, whether it be for patching supplies or vintage and preloved clothing.
You’ll also be the first to hear about eco friendly repair tips and pop up shop dates from my Oxfordshire studio